These are the
blog entries I wrote during an earlier phase of renovation, 2009-2010, previously hosted on the ClimateX website, which is no longer maintained.
Oct. 01, 2009
We live in an Edwardian semi in
Oxford and are about to begin eco-renovation works. The main work will be
installing underfloor insulation under the wooden floor downstairs, insulating
the side wall of the house externally and the front and back walls internally.
We will be using paper-based insulation under the floors and wood-fibre
insulation (Pavatex) internally and externally. The external wall will be
finished with a lime render.
Previously we have installed
additional loft insulation, double glazing, draft proofing, extra floor and
wall insulation in an extension and solar water heating. Hopefully this work -
as well as sorting out some (isolated) woodworm, condensation and slug(!)
problems - will make the house much more cosy and considerably reduce our
energy use for heating.
Oct. 06, 2009
 Day two and despite some
disappointing weather (following a long period of drought), the installer is
making good progress. One of the plus points about Pavatex is that it is
bio-degradable. This makes a difference during the installation. Instead
of lots of polystyrene drifting around the garden (previous experience), we're
hoping to chuck all the small offcuts onto the compost heap.
Day two and despite some
disappointing weather (following a long period of drought), the installer is
making good progress. One of the plus points about Pavatex is that it is
bio-degradable. This makes a difference during the installation. Instead
of lots of polystyrene drifting around the garden (previous experience), we're
hoping to chuck all the small offcuts onto the compost heap.
Oct. 08, 2009
At the end of the fourth day of
working, all the external insulation has been fitted to the side wall of our
house and work has started on rendering to make it water-proof. We have added
100mm of Pavatex woodfibre, which when combined with specific render is called
'Diffutherm'. The Pavatex is 'made from over 95% waste softwood and under 5%
inert water proofing additives'. When added to our solid brick walls, the U
value should improve from around 2.4 W/m2K to 0.33 W/m2K. This is about the
same standard of insulation as required by Building Regs for new homes in 2002.
In any case, you can certainly
feel the temperature difference between the insulated side wall and the
uninsulated (as yet) back and front. All has gone very smoothly so far - even
the scaffolders turning up a day late didn't cause major problems.
Oct. 21, 2009
After the first layer of render
was completed at the end of Week 1, Week 2 involved simply waiting for the
render to dry. Tomorrow, unless there is torrential rain, our contractor - Merl
Cunliffe - will be coming back with a colleague to put on the final layer of
render. This all has to be done in one day, to get a good appearance. After
that layer has dried, it will be painted. Then there will be some further work
in extending the roof by a couple of tiles, to protect the top of the
insulation from rain.
The materials for the external
insulation have cost around £3000. Merl will work for 7 - 8 days in total,
there will be some additional labour in extending the roof tiles, and the cost
of scaffolding to add on top. Not surprisingly, this will end up costing many
times more than getting insulation blown in to cavity walls. If I recall
correctly from a previous home, that took two men in a van about three hours to
complete (for all the flats in a block of four) and cost a subsidised £50.
Happy days! I blame the Edwardians...
Oct. 29, 2009
 Unfortunately preparing our front
room for internal and underfloor insulation involves making things far worse
before they get better. Plaster has been removed from the walls where
insulation will be added, the ceiling coving has been removed temporarily and
all the floorboards are up. As well as being necessary for adding the
underfloor insulation, floorboard removal also allows proper inspection of all
the existing underfloor timbers and checking for damp etc. As the existing
joists are not in the best shape, and already extensively patched we'll
probably be having new joists installed early next week. I suppose the real
suprise would have been no unpleasant suprises under the floorboards...
Unfortunately preparing our front
room for internal and underfloor insulation involves making things far worse
before they get better. Plaster has been removed from the walls where
insulation will be added, the ceiling coving has been removed temporarily and
all the floorboards are up. As well as being necessary for adding the
underfloor insulation, floorboard removal also allows proper inspection of all
the existing underfloor timbers and checking for damp etc. As the existing
joists are not in the best shape, and already extensively patched we'll
probably be having new joists installed early next week. I suppose the real
suprise would have been no unpleasant suprises under the floorboards...
There is still some debate about what
the best form of underfloor insulation will be - the decision really depends on
what the damp specialist finds. If there is a damp problem then paper-based
options would be ruled out. Hemp might be suitable - we'll just have to wait
and see.
Nov. 05, 2009
Our underfloor insulation has
arrived and is now sitting in a big stack in the dining room. As pictured, a
first section has been installed in the front room. It is a hemp batt - not the
Warmcell waste paper-based insulation we had thought we might be having. The
damp in the walls below our damp proof course has meant that Warmcell isn't
suitable. The hemp product is a bit more expensive, but will still give a good
insulation result (see
http://www.natural-building.co.uk/hemp_natural_insulation.htm for technical
details). It'll be good when we have floorboards again, but for the moment
we're at the stage of admiring our lovely new joists and other load bearing timbers
and imagining how cosy it'll be when the job is finished.
Nov. 15, 2009
Our underfloor insulation is now
just about complete. It was installed by attaching netting hammocks (as they
almost certainly aren't known in the trade) to the floor joists to hold the
insulation, and then cutting the hemp batts to fit. The hemp has been installed
to the full depth of the joists - so that's 150mm in the living and dining
rooms and 100mm in the hallway (where the original joists were retained, as
they were in reasonable condition). While the floors were up, the central
heating pipes were insulated - they previously had no insulation around them at
all! New airbricks are also being installed in several places below the floor
level, to ensure adequate ventilation. This should ensure when the floor is
next taken up - hopefully not for many, many years - the joists are still in
perfect condition.
Our internal walls (i.e. front,
back plus an overlap with external insulation to eliminate any potential cold
spots) are now ready for installing the insulation. Firstly the existing
(gypsum) plaster had to removed. Then a layer of lime plaster has been added to
make a smooth surface on which to attach the Pavatex insulation. The major
reason for removing the original plaster is to ensure problem-free moisture
movement within the insulated wall (the insulation system is only guaranteed if
conventional plaster is removed).
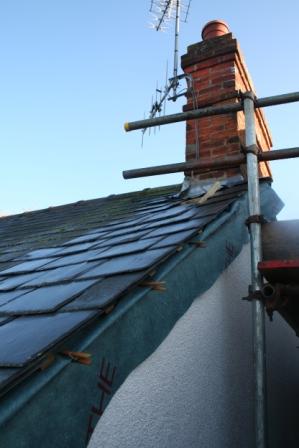
 Outside, the roofers have been
working on extending the roof to cover the external insulation; the slates look
to be a good match, and there's just one half of the verge to be sealed with
mortar. Fortunately, despite yesterday's gales, the roof is still attached to
the rest of the house - perhaps due to the starring role of the clothes
pegs. Our builders have been doing an excellent job of keeping most of
the house habitable during the renovation work, but we're now looking forward to
the switch away from 'creative destruction' to re-instating our walls and
floors.
Outside, the roofers have been
working on extending the roof to cover the external insulation; the slates look
to be a good match, and there's just one half of the verge to be sealed with
mortar. Fortunately, despite yesterday's gales, the roof is still attached to
the rest of the house - perhaps due to the starring role of the clothes
pegs. Our builders have been doing an excellent job of keeping most of
the house habitable during the renovation work, but we're now looking forward to
the switch away from 'creative destruction' to re-instating our walls and
floors.
Nov. 23, 2009
 We are now half-way through the
installation of the Pavatex internal wall insulation. Work has been completed
in the dining room, just the living room to go. The insulation is 6cm thick and
is installed by screwing onto the wall, using insulated screws to fix it in
place. We had wondered how it would look to add this extra thickness internally
- but even before plaster has been added on top it looks great. It may be
partly psychological - but the room does feel cosier already. Certainly, not
having a radiator in the dining room (temporarily removed) hasn't been a
problem - the heating drifting in from the hall and kitchen have kept us
perfectly warm. Not only that, but since the floor insulation has been finished
we no longer have any visiting slugs!
We are now half-way through the
installation of the Pavatex internal wall insulation. Work has been completed
in the dining room, just the living room to go. The insulation is 6cm thick and
is installed by screwing onto the wall, using insulated screws to fix it in
place. We had wondered how it would look to add this extra thickness internally
- but even before plaster has been added on top it looks great. It may be
partly psychological - but the room does feel cosier already. Certainly, not
having a radiator in the dining room (temporarily removed) hasn't been a
problem - the heating drifting in from the hall and kitchen have kept us
perfectly warm. Not only that, but since the floor insulation has been finished
we no longer have any visiting slugs!
 Given that it looks like the
adding internal insulation isn't going to look 'wrong' in the house, it does
make me wonder whether we should have thought more seriously about going for
completely internal insulation rather than external insulation on the side
wall, and internal on the back and front. However, the external insulation is thicker
- 10cm - and we wouldn't have wanted that thickness internally. It will be
interesting to look at the costs of the external vs internal insulation when
all the bills have come in.
Given that it looks like the
adding internal insulation isn't going to look 'wrong' in the house, it does
make me wonder whether we should have thought more seriously about going for
completely internal insulation rather than external insulation on the side
wall, and internal on the back and front. However, the external insulation is thicker
- 10cm - and we wouldn't have wanted that thickness internally. It will be
interesting to look at the costs of the external vs internal insulation when
all the bills have come in.
Dec. 09, 2009
A lot of progress has been made
in the past week and a half. All the internal insulation is now installed,
there is a first coat of lime plaster on all surfaces, and a final coat on some
areas. Insulation has also been added within the mini 'roof' space above our
living room box bay window and an area of the living room ceiling which was in
poor condition has been replastered.
In addition, we have had new
wooden double-glazed sash windows installed in the box bay, as it made sense to
do this in conjunction with insulating around the window area. Several years
ago we had the rest of the sash windows replaced with modern double glazed
ones, as they were not in great condition, draughty, prone to condensation etc.
At that time we decided against replacing the ones in the bay, due to cost.
However, we have had to resort to plastic film over the bay windows in winter
to cut down draughts (despite having had them 'professionally' draught proofed)
and reduce condensation - which would hardly be a good look in a supposedly
eco-renovated property. So new windows it is! They do look very nice and that
area of the room is much cosier than it was - even before the radiator has been
replaced.
Today a man came and created new
ceiling cornice to replace what had to be taken down to install the insulation.
It looks very good. Another nice period detail which has been retained is a
cutaway shape in the walls next to the bay window (see photo, which will
explain this better than I can).
The main work remaining inside is
to put on the final coat of lime plaster in most areas, put the radiators on,
add, sand and seal the wooden floor on top of the existing hardboard and other
finishing details. Outside, work has started on adding conventional external
insulation to the bottom part of the wall, below the damp proof course, where
eco-materials weren't suitable.
It certainly feels that we're
nearing the end, and that by Christmas all of the major work will be complete.
Jan. 05, 2010
Before Christmas most of the
remaining work on our insulation was completed, and we were able to start
living properly in our home again. As well as the insulation work, we had a new
British oak floor fitted, to replace the somewhat battered and woodwormed
previous floorboards. It looks rather lovely, as do the insulated walls and
details around the windows and ceilings. I doubt anyone would notice we've had
internal insulation added, unless we pointed it out.
 We're very keen to find out how
much energy the added insulation (and much improved air tightness) is saving -
but it's too soon to really know as the builders only left the week before
Christmas. However, our heating and hot water energy consumption in the two
weeks before and after Christmas was more than a quarter lower this year than
last - and clearly this year is much colder! Still, we'll need rather more time
to monitor 'after' before we can say how much energy and carbon is being saved.
We're very keen to find out how
much energy the added insulation (and much improved air tightness) is saving -
but it's too soon to really know as the builders only left the week before
Christmas. However, our heating and hot water energy consumption in the two
weeks before and after Christmas was more than a quarter lower this year than
last - and clearly this year is much colder! Still, we'll need rather more time
to monitor 'after' before we can say how much energy and carbon is being saved.
I was speaking to a neighbour
with a house of a similar age, and she said they were really having problems
keeping the bedrooms in the old part of the house warm enough overnight in this
cold weather. Their temperature was dropping to 12C - whereas I don't think our
has dropped below 16C (with the rooms generally at 18C when the heating is on).
We have bought a couple of temperature data monitors, so should have proper
data on this soon.
June 06, 2010
The major work on our home was
finished almost five months ago, with most of the little bits and pieces
completed a few weeks ago, and only the inevitable final bits of re-decorating
waiting to be finished.
Now that memories of the
disruption of the renovation work are less vivid, it's a good time to write
about just how pleased we are with the changes. To start with - the energy and
carbon savings have been substantial. Comparing the first two months of this
year with last, we have saved 20% of our gas consumption, which I would
estimate means the insulation work has resulted in a heating energy saving of
30%. This is probably a conservative estimate, in that this year was colder
than last (so more heating energy needed to achieve the same internal
temperature) and I haven't corrected for that in the 30% figure. We'll keep
monitoring over the coming months and see how that figure develops next heating
season.
Secondly, I would say the house
is definitely more thermally comfortable - even though we've ensured we haven't
raised our internal temperatures. The walls aren't cold any more, there are no
draughts from the floorboards and the temperature stays very constant. Even at
the coldest part of the winter, when our heating was off overnight, the room
temperatures only dropped by at most 3 degrees Celcius.
Thirdly, when we walk back into
the house after being away for a couple of days it smells faintly of new wood.
Prior to the work, it used to smell slightly of depressing damp. The
eco-renovation work (and associated work) has definitely resolved our damp and
condensation problems.
Another benefit, almost beyond
price, has been the total lack of slugs since the work! Given how well the
floor insulation was detailed, this is not really a surprise. Although, I
wouldn't really put anything past slugs...
On to cost - this has not been a
cheap exercise. If we add together the cost of external and internal wall
insulation and the underfloor insulation, and compare it with the energy
savings, the payback period is greater than one hundred years. That is assuming
no addition to the capital value of the house, present day gas prices
etc.
The cost of the external wall
insulation worked out at around £150/m2. Internal wall insulation may have cost
as much as twice that - but those figures are very difficult to work out as we
had a lot of other work done at the same time by the same people, and most of
the cost was related to labour and not materials. I think our internal
insulation costs were particularly high because of the period features we
retained, and the fact that this was a fairly new area of work for some of the
people involved, and they were having to learn as they went along. The good
thing is that I am convinced the work was extremely meticulous and of very high
quality - but we have had to pay for that attention to detail. Hopefully, as
expertise in the sector grows, prices will fall.
Overall, we are very happy with
the work that has been done. Of course it would have been great if it were less
expensive - but the cost was in line with our expectations - and it has had
important benefits beyond just the energy savings which were our main goal. We
are hoping others can learn from our experience and will be opening our home as
part of Heritage Open Days, 11 and 12 September 2010.


